
Pod 的存储之Configmap
阅读 (245559)
分享
一、Configmap介绍
ConfigMap 功能在 Kubernetes1.2 版本中引入,许多应用程序会从配置文件、命令行参数或环境变量中读取配置信息。ConfigMap API 给我们提供了向容器中注入配置信息的机制,ConfigMap 可以被用来保存单个属性,也可以用来保存整个配置文件或者 JSON 二进制大对象。
1、使用目录创建
在我们的 configmap-map 文件夹下有两个文件分别为: test-1 与 test-2 里面的内容分别为:
cat test-1 :
enemies=aliens
lives=3
enemies.cheat=true
enemies.cheat.level=noGoodRotten
secret.code.passphrase=UUDDLRLRBABAS
secret.code.allowed=true
secret.code.lives=30
cat test-2 :
color.good=purple
color.bad=yellow
allow.textmode=true
how.nice.to.look=fairlyNice
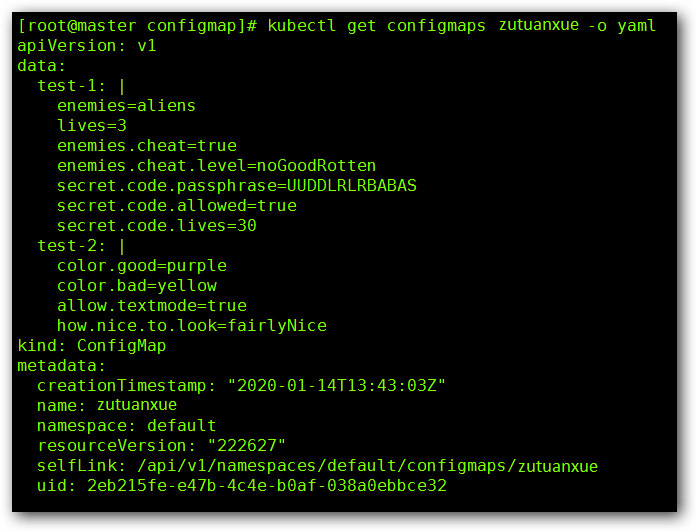
创建:kubectl create configmap zutuanxue --from-file=configmap-test
# —from-file 指定在目录下的所有文件都会被用在 ConfigMap 里面创建一个键值对,键的名字就是文件名,值就是文件的内容
创建完成后我们来看一下信息:

通过命令 kubectl get configmaps zutuanxue -o yaml 查看一下完整的信息:
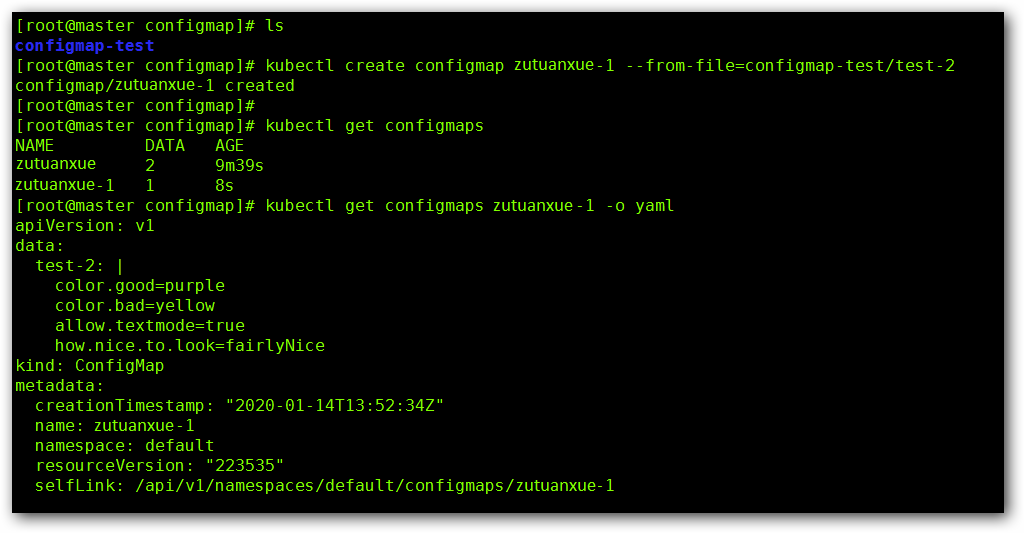
2、使用文件创建
我们依然使用 test-1 与 test-2 这两个文件

kubectl create configmap zutuanxue-1 --from-file=configmap-test/test-2

# —from-file 这个参数可以使用多次,你可以使用两次分别指定上个实例中的那两个配置文件,效果就跟指定整个目录是一样的
我们来看一下效果:
3、使用字面值创建
使用文字值创建,利用  —from-literal 参数传递配置信息,该参数可以使用多次,格式如下:

kubectl create configmap zutuanxue --from-literal=test.how=hello-word --from-literal=test.type=hi-word
我们来看一下效果:

二、Pod 中使用 ConfigMap
1、使用 ConfigMap 来替代环境变量
vim test.yaml

apiVersion: v1
kind: ConfigMap
metadata:
  name: special-config
  namespace: default
data:
  special.how: hello-word
  special.type: hi-word

#-----------------------------# 分割线 #--------------------------------------#

vim test-env.yaml

apiVersion: v1
kind: ConfigMap
metadata:
  name: env-config
  namespace: default
data:
  log_level: INFO

#-----------------------------# 分割线 #--------------------------------------#

vim test-pod.yaml

apiVersion: v1
kind: Pod
metadata:
  name: dapi-test-pod
spec:
  containers:
  - name: test-container
    image: docker.io/busybox
    command: [ "/bin/sh", "-c", "env" ]
    env:
    - name: SPECIAL_LEVEL_KEY
      valueFrom:
        configMapKeyRef:
          name: special-config
          key: special.how
    - name: SPECIAL_TYPE_KEY
      valueFrom:
        configMapKeyRef:
          name: special-config
          key: special.type
    envFrom:
    - configMapRef:
        name: env-config
  restartPolicy: Never
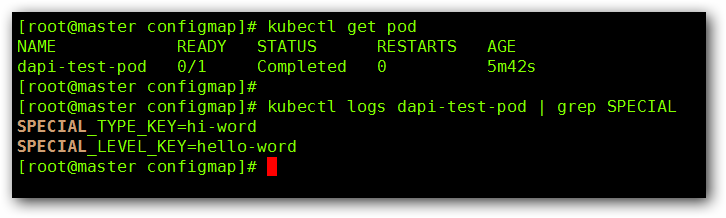
运行以后我们来看一下结果:
2、用 ConfigMap 设置命令行参数
这里我们依然使用 test.yaml 文件内的参数:

apiVersion: v1
kind: ConfigMap
metadata:
  name: special-config
  namespace: default
data:
  special.how: hello-word
  special.type: hi-word

#-----------------------------# 分割线 #--------------------------------------#

vim test-pod-1.yaml

apiVersion: v1
kind: Pod
metadata:
  name: dapi-test-pod-1
spec:
  containers:
  - name: test-container
    image: docker.io/busybox
    command: [ "/bin/sh", "-c", "echo $(SPECIAL_LEVEL_KEY) $(SPECIAL_TYPE_KEY)" ]
    env:
    - name: SPECIAL_LEVEL_KEY
      valueFrom:
        configMapKeyRef:
          name: special-config
          key: special.how
    - name: SPECIAL_TYPE_KEY
      valueFrom:
        configMapKeyRef:
          name: special-config
          key: special.type
  restartPolicy: Never
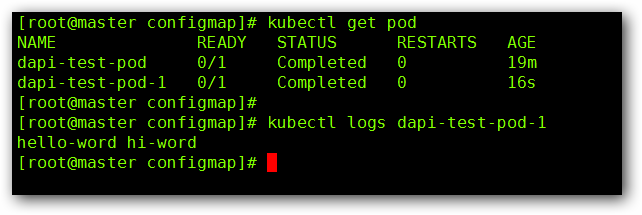
运行以后我们来看一下结果:
3、通过数据卷插件使用ConfigMap
这里我们依然使用 test.yaml 文件内的参数:
apiVersion: v1
kind: ConfigMap
metadata:
name: special-config
namespace: default
data:
special.how: hello-word
special.type: hi-word
#-----------------------------# 分割线 #--------------------------------------#
在数据卷里面使用这个 ConfigMap,有不同的选项。最基本的就是将文件填入数据卷,在这个文件中,键就是文件名,键值就是文件内容。
#-----------------------------# 分割线 #--------------------------------------#
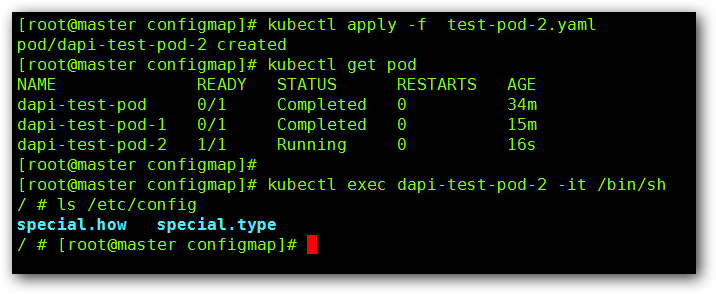
vim test-pod-2.yaml
apiVersion: v1
kind: Pod
metadata:
name: dapi-test-pod-2
spec:
containers:
- name: test-container
image: docker.io/busybox
command: [ "/bin/sh", "-c", "sleep 600s" ]
volumeMounts:
- name: config-volume
mountPath: /etc/config
volumes:
- name: config-volume
configMap:
name: special-config
restartPolicy: Never
运行以后我们来看一下结果:

微信扫描 获取更多学习资料
需要
登录
才可以提问哦
: