
ELK-单机部署Elasticsearch
阅读 (14925)
分享
一、Elasticsearch简介
Elasticsearch(简称ES)是一个开源的分布式搜索引擎,Elasticsearch还是一个分布式文档数据库。所以它提供了大量数据的存储功能,快速的搜索与分析功能。
提到搜索,大家肯定就想到了百度,谷歌,必应等。当然也有如下的搜索场景。
二、Elasticsearch部署方法
- JDK安装并设置为默认java环境
- Elasticsearch安装
- 配置elasticsearch监听ip地址
- 测试
关于软件获得
1、JDK    注意:下载页面,需要接受下载协议才能下载
jdk13 https://download.oracle.com/otn-pub/java/jdk/13.0.2+8/d4173c853231432d94f001e99d882ca7/jdk-13.0.2_linux-x64_bin.rpm

2、Elasticsearch https://artifacts.elastic.co/downloads/elasticsearch/elasticsearch-7.6.0-x86_64.rpm

3、logstash https://artifacts.elastic.co/downloads/logstash/logstash-7.6.0.rpm

4、kibana  https://artifacts.elastic.co/downloads/kibana/kibana-7.6.0-x86_64.rpm

5、filebeat https://artifacts.elastic.co/downloads/beats/filebeat/filebeat-7.6.0-x86_64.rpm
2.1、JDK安装
JDK介绍
JDK的全称是Java Development Kit,是Sun公司免费提供的Java语言的软件开发工具包,其中包含Java虚拟机(JVM),java运行环境(JRE)。编写好的Java源程序经过编译可形成Java字节码,只要安装了JDK,就可以利用JVM解释这些字节码文件,从而保证了Java的跨平台性。
JDK安装方法
- 软件安装[本次安装jdk13.0.2]
- 设置环境变量,默认java环境为新安装环境
#1、软件安装
#默认安装路径/usr/java/jdk-13.0.2
[root@node1 ~]# rpm -ivh jdk-13.0.2_linux-x64_bin.rpm
警告:jdk-13.0.2_linux-x64_bin.rpm: 头V3 RSA/SHA256 Signature, 密钥 ID ec551f03: NOKEY
Verifying...        ################################# [100%]
准备中...            ################################# [100%]
正在升级/安装...
   1:jdk-13.0.2-2000:13.0.2-ga  ################################ [100%]

or
如果有依赖,可以通过yum解决依赖
[root@node1 elk_7.6_soft]# yum -y localinstall jdk-13.0.2_linux-x64_bin.rpm


#2、设置环境变量,默认java环境为新安装环境
#注意  java环境给谁用
#/etc/profile
#~/.bash_profile
#在/etc/profile文件中追加以下环境变量,并导出为全局变量
[root@node1 ~]# tail -4 /etc/profile
#JAVA安装路径
JAVA_HOME=/usr/java/jdk-13.0.2/
#JAVA命令输出
PATH=$JAVA_HOME/bin:$PATH:$HOME/bin
#JAVA库文件
CLASSPATH=.:$JAVA_HOME/lib/tools.jar:$JAVA_HOME/lib/dt.jar
#导出全局
export PATH JAVA_HOME CLASSPATH CATALINA_HOME

#重载/etc/profile文件到内存,生效变量
[root@node1 ~]# source /etc/profile

#3、测试java默认环境
[root@node1 ~]# java --version
java 13.0.2 2020-01-14		#看这里,看这里,完美!
Java(TM) SE Runtime Environment (build 13.0.2+8)
Java HotSpot(TM) 64-Bit Server VM (build 13.0.2+8, mixed mode, sharing)
2.2 Elasticsearch安装
Elasticsearch安装方法
- Elasticsearch RPM安装
- yum源安装
- 源码安装
Elasticsearch安装方法对比
Elasticsearch RPM安装:
需要提前下好安装包,如果有依赖需要手动解决依赖,压力山大!
yum源安装
傻瓜式安装,做好yum源即可,网络很重要。
源码安装
源码自定义安装,可以优化软件功能,删减功能,高手的选择。
RPM安装方法
a、下载elasticsearch RPM包
b、安装elasticsearch
a、下载elasticsearch RPM包
[root@node1 ~]# wget https://artifacts.elastic.co/downloads/elasticsearch/elasticsearch-7.6.0-x86_64.rpm

b、安装elasticsearch
[root@node1 ~]# rpm -ivh elasticsearch-7.6.0-x86_64.rpm
警告:elasticsearch-7.6.0-x86_64.rpm: 头V4 RSA/SHA512 Signature, 密钥 ID d88e42b4: NOKEY
Verifying...         ################################# [100%]
准备中...             ################################# [100%]
Creating elasticsearch group... OK
Creating elasticsearch user... OK
正在升级/安装...
   1:elasticsearch-0:7.6.0-1   ################################# [100%]
### NOT starting on installation, please execute the following statements to configure elasticsearch service to start automatically using systemd				安装服务到systemd服务,方便使用systemctl管理服务
 sudo systemctl daemon-reload
 sudo systemctl enable elasticsearch.service
### You can start elasticsearch service by executing
 sudo systemctl start elasticsearch.service    服务启动方法
Created elasticsearch keystore in /etc/elasticsearch
[/usr/lib/tmpfiles.d/elasticsearch.conf:1] Line references path below legacy directory /var/run/, updating /var/run/elasticsearch → /run/elasticsearch; please update the tmpfiles.d/ drop-in file accordingly.
[/usr/lib/tmpfiles.d/libstoragemgmt.conf:1] Line references path below legacy directory /var/run/, updating /var/run/lsm → /run/lsm; please update the tmpfiles.d/ drop-in file accordingly.
[/usr/lib/tmpfiles.d/libstoragemgmt.conf:2] Line references path below legacy directory /var/run/, updating /var/run/lsm/ipc → /run/lsm/ipc; please update the tmpfiles.d/ drop-in file accordingly.
[/usr/lib/tmpfiles.d/mdadm.conf:1] Line references path below legacy directory /var/run/, updating /var/run/mdadm → /run/mdadm; please update the tmpfiles.d/ drop-in file accordingly.
[/usr/lib/tmpfiles.d/radvd.conf:1] Line references path below legacy directory /var/run/, updating /var/run/radvd → /run/radvd; please update the tmpfiles.d/ drop-in file accordingly.
[/usr/lib/tmpfiles.d/spice-vdagentd.conf:2] Line references path below legacy directory /var/run/, updating /var/run/spice-vdagentd → /run/spice-vdagentd; please update the tmpfiles.d/ drop-in file accordingly.


安装路径 /usr/share/elasticsearch/
yum源安装
a、安装elasticsearch gpg key
b、设置yum源
c、安装elasticsearch
a、=================安装elasticsearch key=================
[root@node1 ~]# rpm --import https://artifacts.elastic.co/GPG-KEY-elasticsearch

b、=================设置yum源=================
[root@node1 ~]# cat >>/etc/yum.repos.d/elk.repo <<EOF
> [elasticsearch-7.x]
> name=Elasticsearch repository for 7.x packages
> baseurl=https://artifacts.elastic.co/packages/7.x/yum
> gpgcheck=1
> gpgkey=https://artifacts.elastic.co/GPG-KEY-elasticsearch
> enabled=1
> autorefresh=1
> type=rpm-md
> EOF

c、=================安装elasticsearch=================
[root@node1 ~]#  yum install elasticsearch
源码安装
a、下载源码包
b、解压安装
c、启动测试
挑战自我,超越自我,you can you do!

参考官方手册
https://www.elastic.co/guide/en/elasticsearch/reference/7.6/targz.html
Elasticsearch配置文件目录结构
elasticsearch安装目录:/usr/share/elasticsearch/
elasticsearch配置文件目录:/etc/elasticsearch/
[root@node1 ~]# cd /etc/elasticsearch/

[root@node1 elasticsearch]# tree
.
├── elasticsearch.keystore	#key存储
├── elasticsearch.yml	#主配置文件
├── jvm.options			#JVM虚拟机参数配置文件
├── log4j2.properties	#记录日志
├── role_mapping.yml	#空文件
├── roles.yml					#空文件,定义权限文件
├── users							#空文件,定义用户文件
└── users_roles				#空文件

四个空文件是ES权限控制文件
Elasticsearch设置[拓展]
#堆内存设置
jvm将内存逻辑分区,主要分为堆、栈、方法区
java创建的对象放在堆内存中
java创建的方法是放在栈内存执行,包括局部变量
java源码编译后二进制文件执行要加载到方法区,常量池也存在方法区

#详情可参考天易IT学院java课程
数据结构
JVM课程

Elasticsearch 默认安装后设置的堆内存是 1 GB。对于任何一个业务部署来说, 这个设置都太小了。如果你正在使用这些默认堆内存配置,您的集群可能会出现问题。

#建议不要超过32G

官方解释
在 Java 中,所有的对象都分配在堆上,并通过一个指针进行引用。 普通对象指针(OOP)指向这些对象,通常为 CPU 字长 的大小:32 位或 64 位,取决于你的处理器。指针引用的就是这个 OOP 值的字节位置。

对于 32 位的系统,意味着堆内存大小最大为 4 GB。对于 64 位的系统, 可以使用更大的内存,但是 64 位的指针意味着更大的浪费,因为你的指针本身大了。更糟糕的是, 更大的指针在主内存和各级缓存(例如 LLC,L1 等)之间移动数据的时候,会占用更多的带宽。

Java 使用一个叫作 内存指针压缩(compressed oops)的技术来解决这个问题。 它的指针不再表示对象在内存中的精确位置,而是表示 偏移量 。这意味着 32 位的指针可以引用 40 亿个 对象 , 而不是 40 亿个字节。最终, 也就是说堆内存增长到 32 GB 的物理内存,也可以用 32 位的指针表示。

一旦你越过那个神奇的 ~32 GB 的边界,指针就会切回普通对象的指针。 每个对象的指针都变长了,就会使用更多的 CPU 内存带宽,也就是说你实际上失去了更多的内存。事实上,当内存到达 40–50 GB 的时候,有效内存才相当于使用内存对象指针压缩技术时候的 32 GB 内存。

这段描述的意思就是说:即便你有足够的内存,也尽量不要 超过 32 GB。因为它浪费了内存,降低了 CPU 的性能,还要让 GC 应对大内存。

#GC,全称是 Garbage Collection (垃圾收集)或者 Garbage Collector(垃圾收集器)

#参考文档
https://www.elastic.co/guide/cn/elasticsearch/guide/current/heap-sizing.html

#设置方法
[root@node1 ~]#vim /etc/elasticsearch/jvm.options
# Xms represents the initial size of total heap space
# Xmx represents the maximum size of total heap space

-Xms1g
-Xmx1g
Elasticsearch服务管理方法
a、开机启动服务
b、服务启动管理
a、开机启动服务
[root@node1 ~]# systemctl enable elasticsearch.service
Synchronizing state of elasticsearch.service with SysV service script with /usr/lib/systemd/systemd-sysv-install.
Executing: /usr/lib/systemd/systemd-sysv-install enable elasticsearch
Created symlink /etc/systemd/system/multi-user.target.wants/elasticsearch.service → /usr/lib/systemd/system/elasticsearch.service.
b、服务启动管理
[root@node1 ~]# systemctl start elasticsearch.service
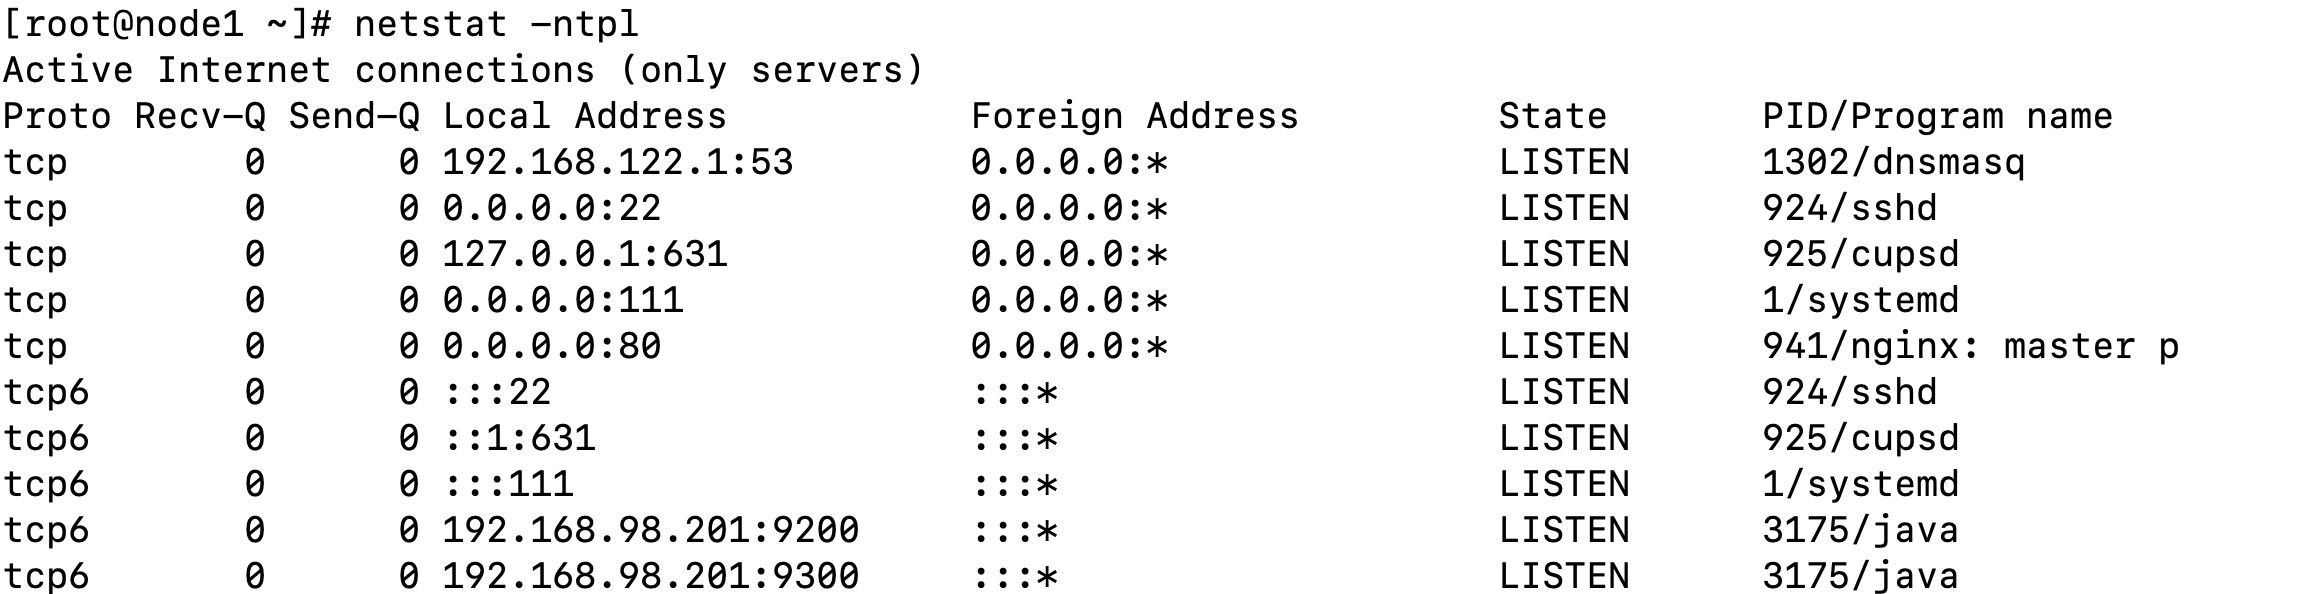
c、启动测试
[root@node1 ~]# netstat -ntpl
.....
tcp6 0 0 127.0.0.1:9200 :::* LISTEN 2698/java
tcp6 0 0 ::1:9200 :::* LISTEN 2698/java
tcp6 0 0 127.0.0.1:9300 :::* LISTEN 2698/java
tcp6 0 0 ::1:9300 :::* LISTEN 2698/java
2.3、配置Elasticsearch监听本地外网地址
绑定ES监听地址为:192.168.98.201
[root@node1 ~]# vim /etc/elasticsearch/elasticsearch.yml
# ---------------------------------- Network --------------------------
#
# Set the bind address to a specific IP (IPv4 or IPv6):
#
network.host: 192.168.98.201    #删除#号,设置本机某个公网地址或0.0.0.0
#
# Set a custom port for HTTP:
#
#http.port: 9200
#
# For more information, consult the network module documentation.
#
# --------------------------------- Discovery -------------------------
#
# Pass an initial list of hosts to perform discovery when this node is started:
# The default list of hosts is ["127.0.0.1", "[::1]"]
#
#discovery.seed_hosts: ["host1", "host2"]
#
# Bootstrap the cluster using an initial set of master-eligible nodes:
#如果ES设置公网地址,非localhost,那么它就会认为这是一个es集群,必须有一个master
#所有开启下面这行,指定master可以是哪个node。
cluster.initial_master_nodes: ["192.168.98.201"] #删除#号,写上自己本地地址
#
# For more information, consult the discovery and cluster formation module documentation.
重启服务生效
[root@node1 ~]# systemctl restart elasticsearch.service
2.4、测试
验证端口及监听地址
通过浏览器访问ES


微信扫描 获取更多学习资料
需要
登录
才可以提问哦
: