
Spring Cloud Bus
阅读 (6576690)
分享
1、Spring Cloud Bus概述
Spring Cloud Bus主要用于管理和传播分布式项目中的消息,它利用消息中间件的广播机制传播消息。它通过轻量消息代理连接各个分布点;通过分布式的启动器对Spring Boot应用进行扩展;用Amqp消息代理作为通道来建立应用之间的通信频道。它目前支持Kafka和RabbitMQ。
2、用Spring Cloud Bus 刷新配置信息
2.1、添加服务器端的依赖和配置,并启用支持
2.1.1、添加依赖
        <!--Spring Cloud Config依赖-->
        <dependency>
            <groupId>org.springframework.cloud</groupId>
            <artifactId>spring-cloud-config-server</artifactId>
        </dependency>
        <!--Spring Cloud Bus依赖-->
        <dependency>
            <groupId>org.springframework.cloud</groupId>
            <artifactId>spring-cloud-bus</artifactId>
        </dependency>
        <!--Rabbtimq依赖-->
        <dependency>
            <groupId>org.springframework.cloud</groupId>
            <artifactId>spring-cloud-stream-binder-rabbit</artifactId>
        </dependency>
2.1.2、添加配置
在配置文件中添加对Spring Cloud Bus、Bus跟踪和Bus刷新端点的支持
spring.application.name=config-server
server.port=50027
# 配置git仓库的地址
spring.cloud.config.server.git.uri=https://github.com/lingfengxeon/spring-config
# git仓库地址下的相对地址,可以配置多个,用,分割。
spring.cloud.config.server.git.search-paths=config repositories
# git仓库的账号
username=
# git仓库的密码
password=
#启用Bus支持
spring.cloud.bus.enabled=true
#启用Bus的trace跟踪支持
spring.cloud.bus.trace.enabled=true
#启用Bus的刷新端点
management.endpoints.web.exposure.include=bus-refresh
2.1.3、启用配置支持
在启动类中添加注解@EnableConfigServer以支持Config Server
2.2、添加客户端的依赖和配置,并启用支持
2.2.1、添加依赖
        <dependency>
            <groupId>org.springframework.boot</groupId>
            <artifactId>spring-boot-starter-web</artifactId>
        </dependency>
        <!--Spring Cloud Config 依赖-->
        <dependency>
            <groupId>org.springframework.cloud</groupId>
            <artifactId>spring-cloud-starter-config</artifactId>
        </dependency>
        <!--Spring Cloud Bus依赖-->
        <dependency>
            <groupId>org.springframework.cloud</groupId>
            <artifactId>spring-cloud-bus</artifactId>
        </dependency>
        <!--Rabbtimq依赖-->
        <dependency>
            <groupId>org.springframework.cloud</groupId>
            <artifactId>spring-cloud-stream-binder-rabbit</artifactId>
        </dependency>
        <!--Actuator的依赖-->
        <dependency>
            <groupId>org.springframework.boot</groupId>
            <artifactId>spring-boot-starter-actuator</artifactId>
        </dependency>
2.2.2、添加配置
在bootstrap.properties中添加Spring Cloud Bus及跟踪支持
#启用Bus支持
spring.cloud.bus.enabled=true
#启用Bus的跟踪支持
spring.cloud.bus.trace.enabled=true
在application.properties中添加Spring Cloud Bus端点的刷新支持
management.endpoints.web.exposure.include=bus-refresh
2.2.3、添加更新位置
在控制器类上添加注解@RefreshScope,否则客户端在接收到服务器端的更新消息后不知道更新到什么位置
@RestController
@RefreshScope//自动刷新
public class HelloController {

    //获取app的版本
    @Value("${app.version}")
    private String version;

    //获取端口号
    @Value("${server.port}")
    private String port;

    //获取Server端参数message值
    @Value("${message}")
    private String message;

    @GetMapping("/hello")
    public String hello(){
        String str="version:"+this.version+" port:"+this.port+message;
        return str;
    }
}
2.3、启动并刷新客户端的配置
2.3.1、启动客户端
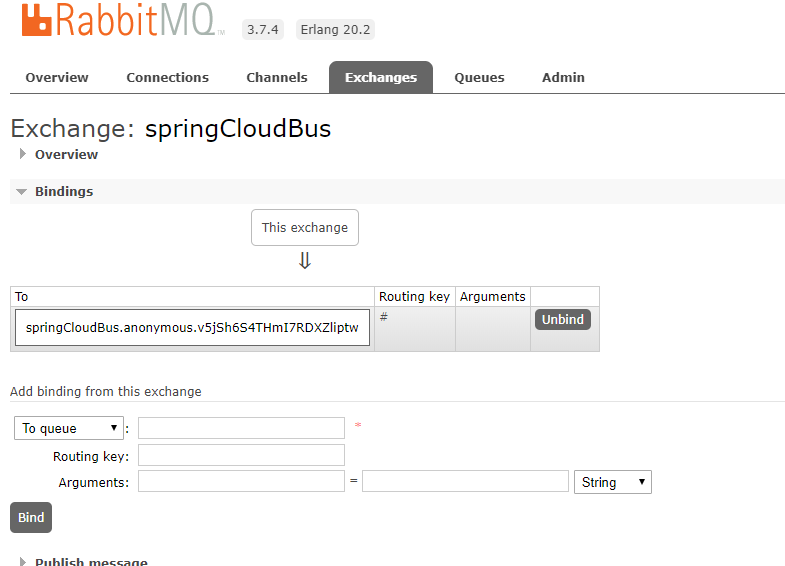
访问RabbitMQ的管理界面http://localhost:15672
2.3.2、刷新客户端配置信息
步骤:
1、修改配置文件,然后将其发布到Git中
app.version=dev
message=Spring Cloud Config
spring.rabbitmq.host=localhost
spring.rabbitmq.port=5672
spring.rabbitmq.username=guest
spring.rabbitmq.password=guest
server.port=50029
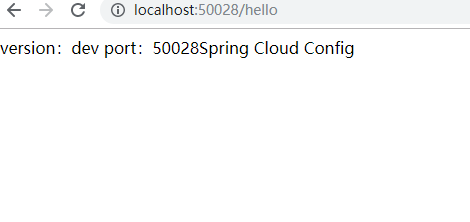
2、访问:http://localhost:50028/hello
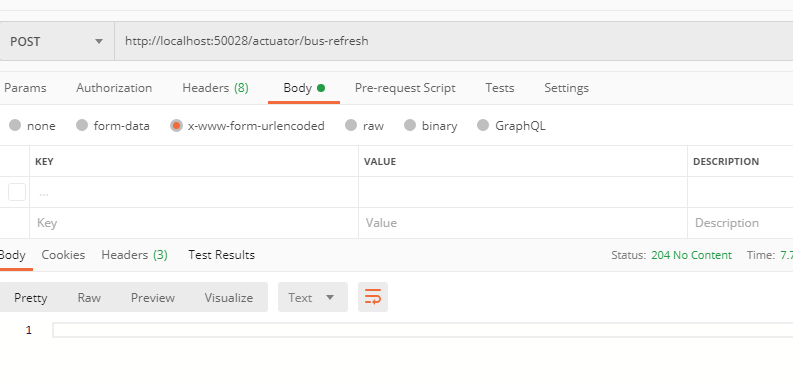
3、使用POST方式提交空消息到http://localhost:50028/actuator/bus-refresh
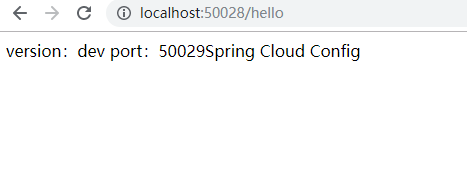
4、访问:http://localhost:50028/hello

微信扫描 获取更多学习资料
需要
登录
才可以提问哦
: